Amazon

24 January 2013

Sephora Inspired Makeup Brush Holder


This was just a quick project that I did so that I could have a pretty way to store my makeup brushes.  I was inspired by the way Sephora displays their makeup brushes in stores.  They put them in plastic containers with glass beads.  I wanted to do the same.

What You Need:
 
What to Do:

This project literally took seconds.  All you do is pour the beads into the container, and then stick your makeup brushes in vertically.  They should stand upright.  Now you can display your brushes and there's no chance of the bristles getting damaged!  It is also very convenient to have them out on top of my dresser when I'm putting on my makeup, instead of having to get them out of a bag. 

16 January 2013

Dorm Room Pillows (Handmade and Inexpensive!)

Before I went to college, I knew that I wanted to get some cozy and cute pillows to adorn my bed.  What better way to add decoration (and function) to an otherwise bland room?  I had already chosen my dark purple comforter, so I wanted pillows that fit in with that color scheme.  Here is what I came up with:

Birds on a Line

This long bird pillow was inspired by Sukan pillows that I saw on Etsy.  I used:
  • Different colored felt sheets
  • Black embroidery thread
  • Grey fabric
  • Pillow stuffing
And here's what I did:
  1. Draw a bird shape onto an index card, and cut it out to use as a pattern.
  2. Cut out different colored birds from the felt.
  3. Cut out two rectangles of the grey fabric, and leave seam allowance.
  4. On the back of one rectangle, draw three horizontal lines and mark off 1/2 inch internals.
  5. With the embroidery thread, stitch on each interval for even stitches.  Use all 6 strands of thread.
  6. Turn the pillow over and place the birds. Have fun and try different arrangements!
  7. Pin the birds in place and topstitch around the edge using matching thread.
  8. Place both grey rectangles right side together and sew around the outside, leaving an opening on bottom.
  9. Flip right side out, and fill with pillow stuffing. Close the opening with a topstitch.


Simple Pillows


The other pillows that I made were much simpler.  I found this really nice cotton fabric that incorporated all of my colors.  To make these two smaller pillows, I just cut out squares of the fabric, and did the last two steps of the last pillow. Super fast and super easy to make!  I got custom pillows for my dorm room that matched my decor and did not break the bank!

01 November 2012

DIY Christian Louboutin Shoes: A Tutorial

I first saw Louboutin shoes when I was watching BBC's Sherlock.  It was the episode with Irene Adler ("A Scandal in Belgravia"), and I thought that they were so cool.  However, the original shoes cost around $800, which is about as far out of my price range as you can get.  So, after doing some research, I decided that I would make my own.  It turns out that Mr. Louboutin first painted the soles of shoes red with nail polish, so I did the same.

What You Need:
  • Heels of your choice
  • Rubbing alcohol
  • Masking tape
  • White nail polish
  • Red nail polish


Step 1: Clean the soles of the shoes with rubbing alcohol.  This will remove any dirt or grease particles.


Step 2: Put masking tape around the edge of the soles, so that no nail polish will get on the actual shoe.  For areas with sharp curves, I found it best to just use small pieces of tape that overlap.

Step 3: Paint one coat of white nail polish.  I used the most inexpensive nail polish that I could find at Target (Sinful Colors "Show Me White).  This coat of white is necessary so that the actually color that you want isn't distorted by the shoe sole color.

Step 4: After the white nail polish is completely dry, paint the soles with two coats of the red polish.  I used Sally Hansen's "Cherry Red" polish.

 Step 5: Let dry completely, and then peel off the paint.  You might have to do some touch-ups near the edges.  Enjoy!

Obviously, you don't have to make these look like Louboutin shoes; you can't paint them any color you want!  I've heard of brides painting the soles of their shoes blue as their "something blue." Whatever you choose, have fun! ~~~~~~~~~~~~~~~~~~~~~~~~~~~~~~~~~~~~~~~~~~~~~~~~~~~~~~~~~~~~~~~~~~~~~~~~~~~~~~ Get everything you'll need now

18 August 2012

Paint Chip Calendar: A Tutorial

Like many of the past projects that I've been doing, this one is inspirered by a post that I saw on Pinterest.  This one comes to you from Welcome to Cheltenham Road.  I decided to do my own take on it and use colors that I liked.  Here's my tutorial

Tutorial

What you need: 
  • A poster frame (mine is 18" by 24" from the Christmas Tree Shoppe for $6)
  • A poster board ($0.64 from Michaels)
  • Paint chips (free from the Home Depot)
  • White erase markers ($1.50 from Five Below)
  • Print-outs of the days of the week
  • Scissors
  • Tape

Step 1: Trim the poster board so that it is the same size as your frame.


Step 2: Cut the paint chips so that they will fit on the poster board.  You will need 5 rows of 7 squares, or 35 squares all together.  Arrange the paint chips and make sure you like how the colors are placed.  Try not to put two squares of the same color next to each other.


Step 3: Turn the squares over and tape them together on the back.  You will end up with 5 rows.  Next, tape these rows together to form a full 5x7 grid all taped together.


Step 4: Tape the entire grid to the poster board.  Make loops with the tape if you do not have double-sided tape.  Make sure that you leave room at the top for the days of the week and the name of the month.


Step 5: Cut out the typed days of the week.  I decided to tape them to the back of some extra paint chips, and then cut out the whole thing to make a boarder.  This gave it a more finished and professional look.


Step 6: Tape the days of the week over the grid.  


Step 7: Put the entire poster board into the frame.  Write on the glass with dry erase markers.  At the end of the month you can erase the whole thing and reuse it!  I hope that this calendar will help me stay organized this coming school year.


~~~~~~~~~~~~~~~~~~~~~~~~~~~~~~~~~~~~~~~~~~~~~~~~~~~~~~~~~~~~~~~~~~~~~~~~~~~~~~~~ Get everything you'll need now

02 August 2012

Shapie Decorated Mug: A Tutorial

This craft was also inspired by this post that I saw on Pinterest by A Beautiful Mess. I wanted to make a customized mug with which to drink my tea this September. I really liked the simplicity of the Sharpie on the white mug and the drawn-on teabag.  Here's my version.

Tutorial

What You Need: a white mug (I got mine from the Christmas Tree Shop for $1), and a Sharpie marker


Step 1: Draw your design on the mug.  This is where you can be creative.  I'm a fan of quotes, so I chose to write a quote by C. S. Lewis that reads: "You can't get a cup of tea big enough or a book long enough to suit me."  I also drew the tag of the tea bag like on the inspiration mug.


Step 2: Bake the mug in the oven at 350 degrees Fahrenheit for 30 minutes.  After it is finished, let it cool in the oven, because it will be very hot.


That's all there is to it! I would recommend hand-washing the mug just to ensure that the design stays on.  Sharpie markers are not actually meant to write on glossy surfaces like mugs.  If you want the design to stay on better, invest in an actual ceramics marker. However, for a $1 investment, I'd say that this is pretty good.
~~~~~~~~~~~~~~~~~~~~~~~~~~~~~~~~~~~~~~~~~~~~~~~~~~~~~~~~~~~~~~~~~~~~~~~~~~~~~~ Get everything you'll need now

31 July 2012

Painted Canvas Quote Poster: A Tutorial

This project was inspired by this post that I first saw on Pinterest and comes from the lovely ladies at A Beautiful Mess.  I decided that I wanted to make my own to hang in my dorm room.


First I used large canvas that I got in at Micheal's and painted it with rainbow splotches.  You can really paint any background you want.


Then, I chose my quote and cut out the stickers that I need.  My quote is, "Go confidently in the direction of your dreams! Live the life you've imaged" by Henry David Thoreau.  After I placed the stickers, I drew guidelines on the canvas and stuck them on.


After I made sure the stickers were down securely, I poured white paint all over the canvas.


Then I spread the paint around.  It took three coats of white to sufficiently cover the rainbow underneath.


Once the white was dry (I used a hairdryer to speed up the process) I peeled off the stickers, and ta da! A great poster with one of my favorite inspirational quotes.

19 June 2012

How to Make Ratatouille from the Movie (Confit Byaldi)


One of my favorite recipes to make is this spin on traditional ratatouille, called Confit Byaldi.  It was created specifically for Pixar's movie "Ratatouille" by French Laundry chef, Thomas Keller.  You can see the original recipe here. Enjoy!


Ingredients: 

  • 3 peppers (red, orange, yellow)
  • 1 onion
  • Minced garlic
  • Extra virgin olive oil
  • 1 large can of diced tomatoes
  • Thym
  • Parsley
  • 1 bay leaf
  • 1 zucchini
  • 1 yellow squash
  • 1 egg plant
  • 4 roma tomatos
  • Balsamic vinegar

Step 1: Preheat the oven to 450 degrees Fahrenheit.


Step 2: Cut each pepper in half, and take out the ribs and the seeds.


Step 3: Place the peppers on a piece of tin foil on a baking pan.  Put in the oven, and let roast for 15 minutes.  When they're done, let them cool.


Step 4: While the peppers are in the oven, finely chop up the onion.


Step 5: Put the chopped onion in a pan along with 2 Tbs. oil and 1 tsp. garlic.  Stir under low heat until the onions are soft, but not brown.  This will take about 8 minutes.


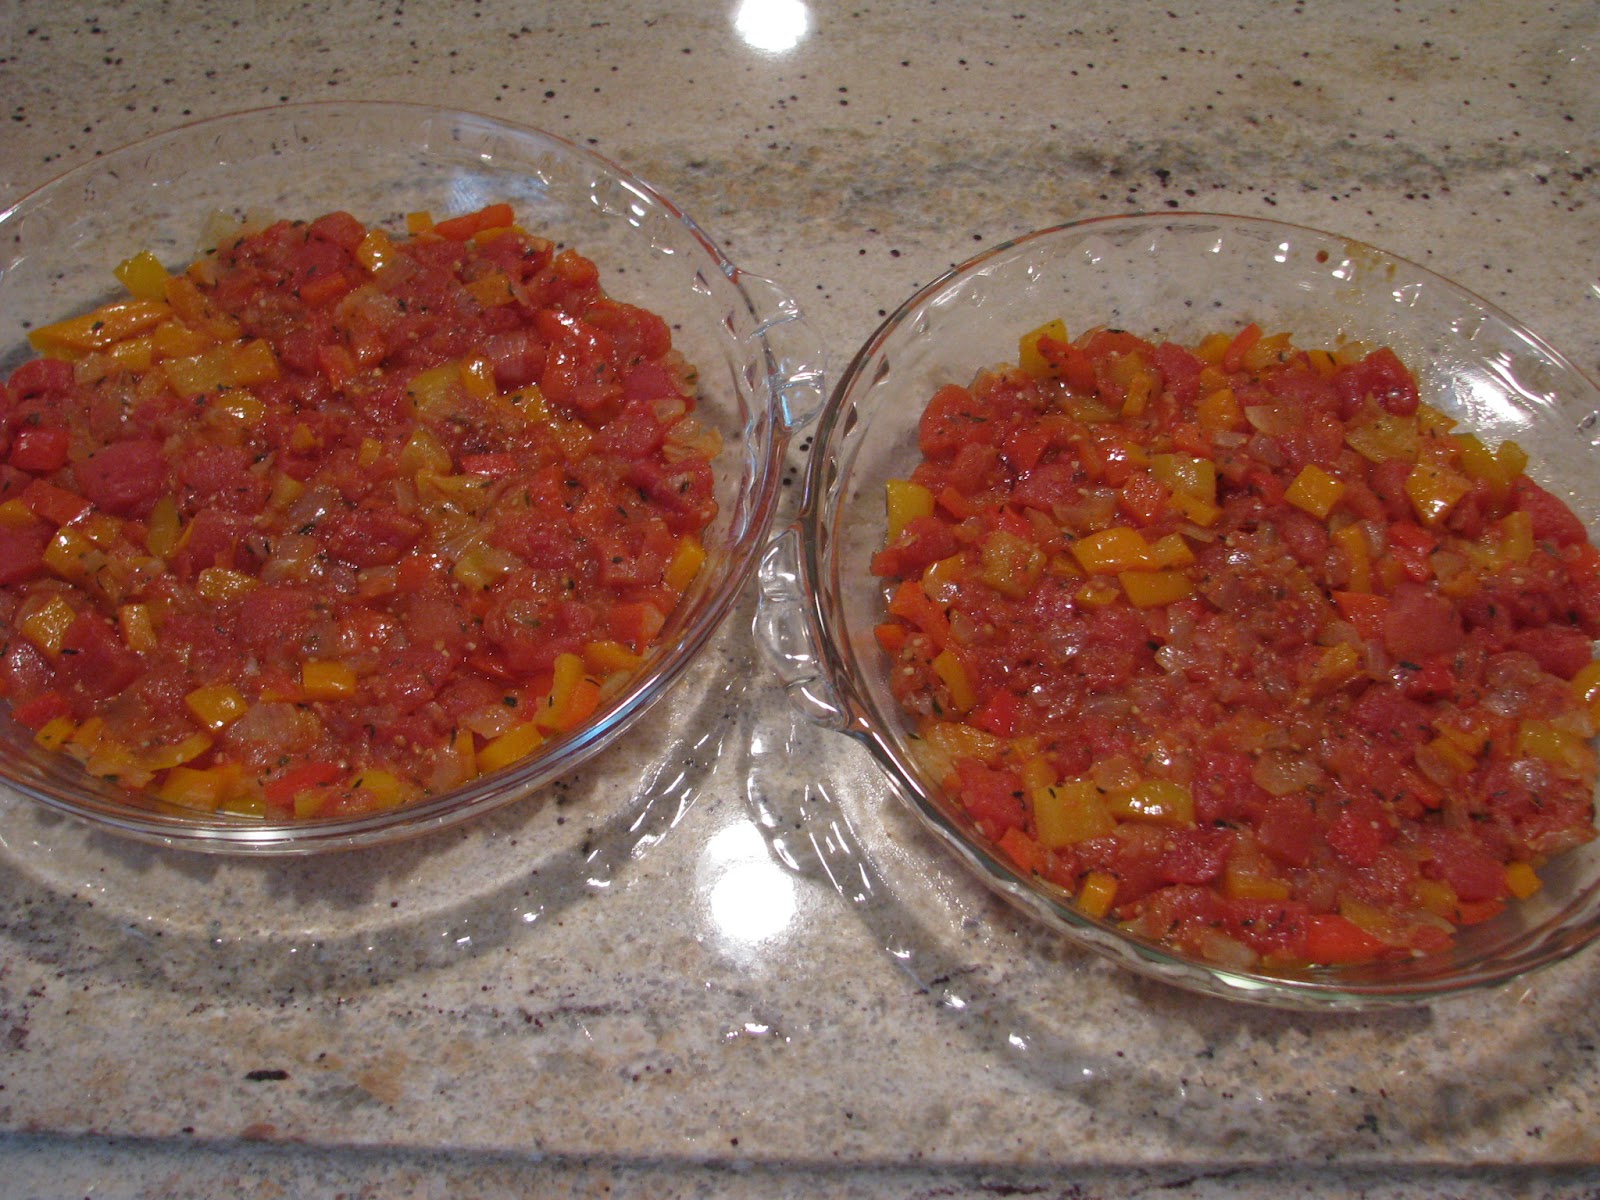
Step 6: Drain the diced canned tomatoes and add that to the pan after the onions have been softened.  Stir in too the bay leaf, parsley, and thyme.  Let the entire mixture simmer until the juices have mostly evaporated.


Step 7: While that is simmering, take your peppers (which should be cool by now) and peel the skin off of them.  Don't worry if all the skin doesn't come off.  After that, cut them up into tiny squares.


Step 8: Add the peppers to the mixture in the pan; stir.  Cover and let simmer, stirring occasionally.


Step 9: While that's simmering, preheat the oven to 275 degrees Fahrenheit.


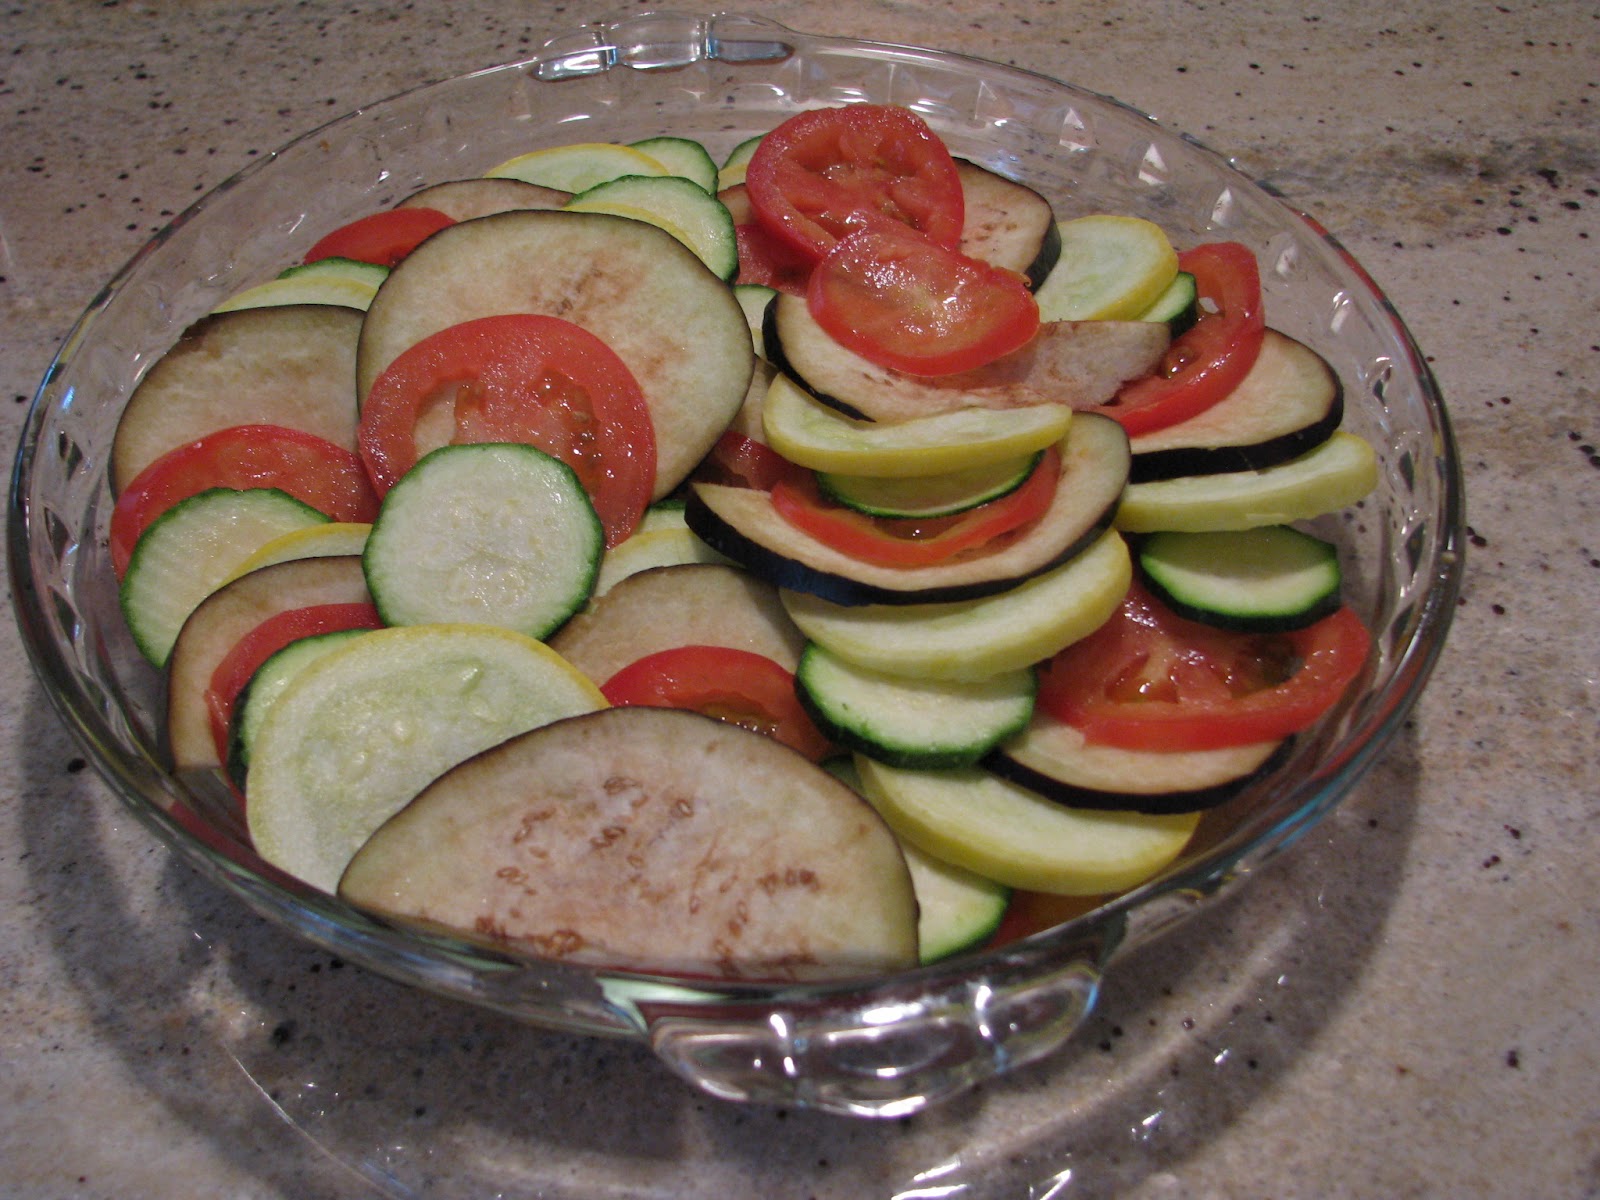
Step 10: Slice up the zucchini, yellow squash, eggplant, and Roma tomatoes.  Put them all in separate bowls.


Step 11: Take the tomato, onion, and pepper mixture off the stove.  Set aside a spoonful of it in a cup.  Put the rest on the bottom of a pan or two pans, depending on how much you have.  I used two 8 inch pans.


Step 12: Now it's time to start layering the vegetable slices.  Choose an order that you like, I did: zucchini, squash, eggplant, tomato (and repeat).  Begin by layering one on top of the other down the center of the pan.  Then spiral around the other edge.  When you make a full rotation, spiral the vegetables in towards the center.  Continue spiraling until the entire pan is covered.


Step 13: Drizzle the top of the vegetables with a mixture of olive oil, thyme, and garlic.


Step 14: Cover the pans with tin foil and scrunch it on the bottom.  Put them in the oven for 2 hours.  After the two hours are up, take the tin foil off and leave them in the oven uncovered for another 30 minutes.


Step 15: Time to make the vinaigrette! In my opinion, this makes the meal.  It's really simple, just add olive oil and balsamic vinegar to the tomato mixture that was set aside earlier.  Store it in the refrigerator.


Step 16: Take the ratatouille out of the oven and enjoy!  I usually like to eat it with pasta.  Tell me what you think and just comment if you have any questions.